The Attendants' Schedule is a visual representation of when your attendants (employees able to be assigned to performing specific activities) are working. You will input the hours that each attendant is available on a specified day using this screen. This allows you to view and configure the daily schedules for your available activities attendants, such as Spa personnel and transportation drivers.
The Attendants' Schedule screen is similar in appearance to the Activity Schedule screen.
The list of available Attendants at your Property and the activities to which they can be assigned are configured as part of the Property and System Configuration area of Skyware Systems. This configuration may be done at any time if you have the appropriate access/authorization.
NOTE: So that your Skyware Systems knows which attendants are available for scheduling during the time periods selected for any activity, you MUST configure the Attendants Schedule BEFORE scheduling any activities.
The Attendants' Schedule is part of our Spas and Activities Module. If your Property does not currently have our Spa & Activities Module and you are interested in adding it, please contact us at Sales@SkywareSystems.com.
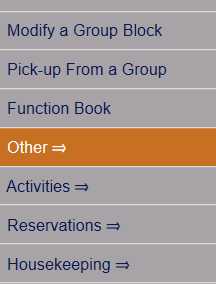
Depending on your Property's configuration, you may be able to access the Activities Menu directly from the Quick Menu.
Select Other from the Quick Menu on the left to be taken to the Other Front Desk Tasks Menu.
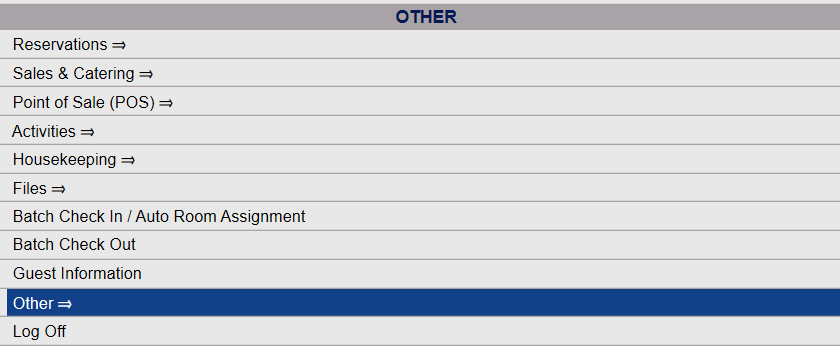
Or select Other => from the Other section (bottom right) of the Full Menu.
Click the icon on the left for the Full menu.
This will display the Full menu in a tabular form, with four sections, Registration, Status, Cashier and Other.
From the Other Section, select Other =>.
This will display the Other Front Desk Tasks Menu, which has four sections, Other List 1, Other List 2, Documents and Web.
Select Activities from the Other Front Desk Tasks menu, Other List 1 section.
This will open the Activities Menu, which has two sections, Items and Reports.
The Attendants Schedule is in the Items section.
When selected, the Attendants' Schedule screen will open.
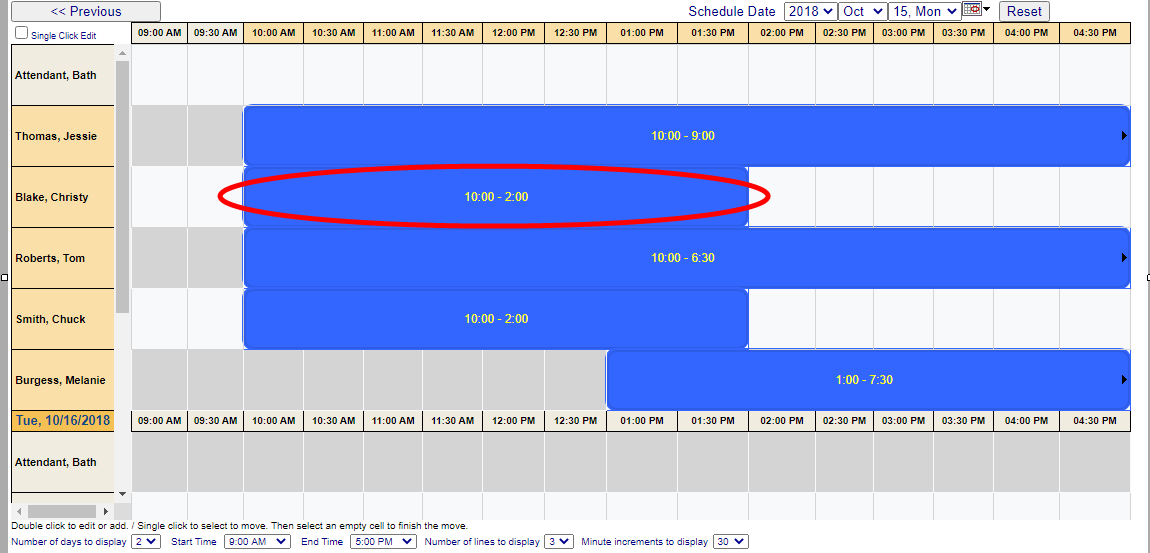
You may view at a glance whom is available and when, on the specified Date. Any availability already entered into the schedule is shown in blue.
By default the Attendant's Schedule screen show the current date. This may be altered using the Schedule Date drop-down menus or by clicking the Calendar icon to select the appropriate date.
You must use the gray button Reset to refresh the schedule.
You can also use the gray buttons Previous Day and Next Day to navigate manually through the schedule calendar.
Once you are viewing the Attendants' Schedule screen for the date desired, you can see the details of your attendants names listed down the screen (on the left) and time slots across the top of the screen, with the scheduled times blocked out showing whom is assigned to the day. Using the cursor to hover over an entry in the schedule will show a pop-up of the activities associated with (able to be performed by) that attendant.
You may add a new entry to the schedule in an unoccupied time slot cell, or edit an entry that already exists, by double-clicking on the appropriate cell.
Double clicking on the time slot cell entry you wish to enter the attendant availability in will open the Attendant Scheduling screen for the specified attendant.
This screen lists the specific attendant by name on the right, where you can enter the schedule details.
Note: On the left side of the screen you will see displayed the names of any attendants that have ALREADY been scheduled for this day, and the times of their schedule. If no-one has yet been scheduled, it will be blank.
Attendant: This is a drop-down menu. Select one.
By default this shows the name of the attendant associated with the cell you selected from the Attendants Schedule screen, but you MAY select ANY attendant that has not yet been scheduled from those configured as available at your Property.
This field is required.
Start Date: This is the Start Date AND time for your attendant's availability.
By default this will be set as the time slot cell that you selected to reach this screen. You may however alter it here if desired.
This field is required.
End Date: This is the End Date AND time for your attendant's availability.
By default this will be set as the next time slot cell from the one that you selected to reach this screen (usually a 30 minute increment). You should alter this to represent the desired length of time the attendant will be available (for example a four hour shift) by using the drop-down menus to alter the fields to show the correct end time.
This field is required.
Note: Remember to change the AM or PM time designation as appropriate.
Comments: If necessary, this section allows you to provide any comments to accompany this attendant's schedule.
When you have finished, click the Save icon () located in the local tool bar at the top of the right side of the screen.
This will add the new schedule to the attendant selected in the Attendant field to those shown on the left side of the screen.
However the Attendants Scheduling screen will remain open. This allows you to add a new schedule to a different attendant.
You will see that now the New and Replicate icons in the local tool bar have become available. (These two icons are NOT available for use when you enter the screen from the Attendant Schedule screen via an EMPTY availability time slot).
Click the New button from the toolbar to add a new Attendant Schedule entry. (You can also select an existing Attendant Schedule entry from the list on the left, and click the Replicate button from the toolbar, if the Schedule is to be the same).
Now to schedule another attendant, simply select the name from those available in the Attendant drop-down menu field, and continue as above selecting the start and end times, and adding a comment if desired.
Once saved any new schedules will appear on the left.
Note: If you attempt to ADD an availability schedule to an attendant that has ALREADY been scheduled, you will be unable to do so. Instead you will see a pop-up message from Skyware Systems when you click the Save icon, informing you of the scheduling conflict, and the Attendant Scheduling Screen will have the error message in red "Schedule Conflicts with !" displayed.
(To EDIT an existing availability schedule for a particular attendant from this screen, you will need to select it (by double clicking) from the list on the left for display on the right. This will then allow you to edit the schedule details for your selected attendant, and display the changes on the left after you save them).
When scheduling is complete, you will need to click the gray button Attendants Schedule in the local tool bar at the top of the screen to return to the Attendants' Schedule screen.
This will now show the updated availability.
Any availability already entered into the schedule is shown in blue. The blue bar will begin at the start of the attendant's availability and continue through the end of it. The time span covered will be shown within it (for example, 10.00-2.00).
If you wish to CHANGE the attendant's scheduled availability, double click ANYWHERE WITHIN the blue bar.
This will open the Attendant Scheduling screen for the specified attendant, with the schedule details displayed on the right side of the screen.
(On the left side of the screen you will see displayed the names of any attendants that have already been scheduled for this day, including this one, and the times of their schedule).
Change the availability Start and End details as necessary.
Start Date: This is the Start Date AND time for your attendant's availability.
This will be set at the beginning time slot cell of the currently scheduled availability.
This field is required.
End Date: This is the End Date AND time for your attendant's availability.
This will be set at the ending time slot cell of the currently scheduled availability.
This field is required.
Comments: Add a comment if desired (for example, why the schedule has been altered).
When you have finished, click the Save icon () located in the local tool bar at the top of the right side of the screen.
This will update the schedule of this attendant shown on the left side of the screen.
Again, the Attendant Scheduling screen will remain open to allow you to edit further availabilities if so desired. To select a different schedule to edit, double click the entry on the left to display it on the right. Otherwise, to return to the Attendants Schedule screen, click the gray button Attendants Schedule in the local tool bar at the top of the screen.
this will open the Attendants' Schedule screen which will now show the updated availability.
Date Updated June 10, 2021